Normal Hours of Operation Information About Plainsman Products ClaysLow Temperature ClaysMedium Temperature Clays High Temperature Clays Porcelains Other Clays Native Clays Casting Slips MaterialsDry MaterialsStains Encapsulated Stains Liquids GlazesSpectrum Opaque Gloss Low Fire GlazesSpectrum Majolica Colors Spectrum Raku Glazes Spectrum Crystals Spectrum Ash Glazes Plainsman Dry Glazes Potter's Choice Cone 5/6 Glazes Celadon Cone 5/6 Glazes Amaco Satin Matte Glazes Spectrum Hi Fire Cone 6 Glazes Spectrum Shino Glazes Cone 6 Liquid Brights UnderglazesCrysanthos UnderglazesSpectrum RAC Underglaze Pens Amaco Velvet Underglazes EnamellingEquipmentKilnsElectric Pottery KilnsElectric Glass Kilns Kiln Furniture Cones Elements Kiln Parts, Accessories Exhaust Systems Refractories Potter's Wheels Slab Rollers Hand Extruders Scales Banding Wheels Air Brushes ToolsBrushesThrowing Tools Trimming, Turning, Cutting Tools Wood/Bamboo Tools Rollers/Stamps Decorating Tools Glazing Tools Ribs & Scrapers Ribbon/Wire Tools Rasps Knives, Needle Tools, Cutters Tool Kits Unclassified AccessoriesMiscellaneous AccesoriesCorks/Stoppers Cork Pads Oil Lamp Accessories Dispenser Pumps Teapot Handles Bisque Tiles Books | Covid-19 Status: Click here to find out more
Visit Our Full Catalog & Store In Store Shopping availablePlainsman Pottery Supply is open for in-store shopping. Pickup orders may still be placed via email at larry@plainsmanclays.com, or over the phone by calling 780-440-4791. Click the links to the left to get information and pricing on our products. Click the "Plainsman Data Sheets" for details information on the use and Plainsman clay bodies and glazes. The blog below is intended to help you with all manner of technical issues in ceramic hobby production, these posts come every few days, so check back often. Technical Tips BlogI drink from these when I dream
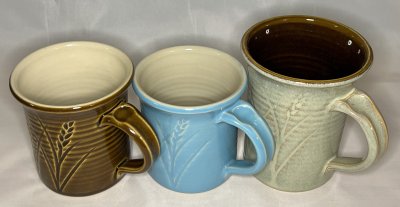
For many years, I have processed the clay for these myself, from lumps I get from the raw stockpiles behind the Plainsman plant. These are made from our PR3D raw clay mined near Ravenscrag, Sask. It is the bottom layer of six. It has the most potential for pottery because it is low in contaminants, fine-grained, light-burning and vitrifies well below cone 10. When I remove all particles coarser than 200 mesh (by slurry up and vibratory sieving) this becomes MNS (mother nature's stoneware) all by itself. Left: 200 mesh. Right 325 mesh. Centre: 150 mesh with added ball clay and feldspar to produce porcelain. Context: Here is What Processing.., Here is why new.. Tuesday 4th November 2025 Rutile Blues - Almost every single stoneware potter uses themThese are made from Canadian materials and recipes
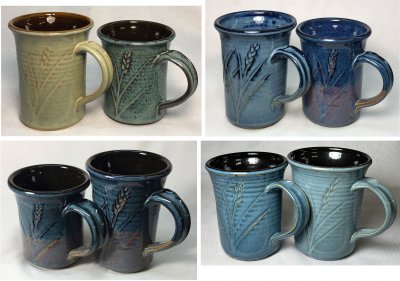
There is a lot of magic, Canadian magic, in this picture. Pretty well every single potter working at mid-temperature needs rutile blue, gloss black, honey amber and transparent glazes (even multiple versions of each). And almost all need a base slip (or engobe). Here they are. Sunday 2nd November 2025 An 85-year-old Medalta Thrown Beer Bottle:How can it be so white, speck-free and uncrazed?
These (right) were made individually in the factory during the 1930s and 1940s (the insides have pronounced throwing rings and slip drips). The potters were able to make up to 500 per day, even though they took the time to smooth the outside using a rib! The inside base of this one is bowl-shaped (the walls near the base are very thick), this helps explain how they were able to throw them so quickly. Context: New incentive to develop.. Saturday 12th July 2025 Absolutely Jet-Black Cone 6 Engobe on M340This could also be super white
This is the L3954B engobe. 15% Mason 6600 black body stain has been added (instead of the normal 10% Zircopax used for white). Of course, a cover glaze is needed for a functional surface. We put a lot of development work into producing a recipe fits this body, M340. It works even when thickly applied because it has the same fired maturity as the body. Lots of information is available on using L3954B (including mixing and adjustment instructions). Engobes are tricky to use, follow the links below to learn more. L3954B is designed to work on regular Plainsman M340 (this piece), M390 and Coffee Clay. Most important we document how to adjust its maturity, and thus firing shrinkage, to fine tune fit if needed. These bodies dry better than porcelains and are much less expensive, so coating them with an engobe to get a surface like this makes a lot of sense. Ed Phillipson discovered this 80 years ago, enabling selling pieces made from these clays as white hotel ware. Context: Mason 6600 Black Stain, L3954B, L3954J black engobe on.., How to make a.., Here is why porcelain.., How to test if.., Stained engobes can be.., The L3954B engobe page.., Thixotropy, Engobe Wednesday 25th June 2025 New incentive to develop Canadian clays:Reduce the “clay miles”.
The materials to make M340 travel 200km to get to our plant (from Ravenscrag, SK). Context: An 85-year-old Medalta Thrown.. Thursday 12th June 2025 Here is why new grinding equipment is needed
These two pieces have been fired to cone 6, without glaze, I use this as a way of comparing changes in the character of the fired surface over time. These are made from a mix of A3 and 3B, our two main raw stoneware clays. The mix has been ground to 42 mesh (using our hammer mill). These materials vary in the amount of sand they contain and the amount of iron stone concretion particulates, so we will also see smoother and more speckle-free than this as a matter of normal variation. We have made sandy and speckled clays like this for so long that they seem normal to me. Yes, rustic bodies do have their appeal. However, the limits of our particle size reduction equipment and current quarry materials have resulted in importing American materials to satisfy customers who want smoother, whiter, more plastic and more vitreous bodies. We are now producing tens of thousands of boxes a year made from these imported materials! Transporting expensive clays at great distances begs the question of why we have not better leveraged the clay resources that are right here. That, and associated independence, quality and lower production costs, are coming soon. Context: An All-Canadian Fine Ball.., Plainsman Ravenscrag Quarry in.., I drink from these.., An upgrade to benefit.., 42 mesh Thursday 12th June 2025 Mel Noble at Plainsman Clay's Ravenscrag, Saskatchewan quarry
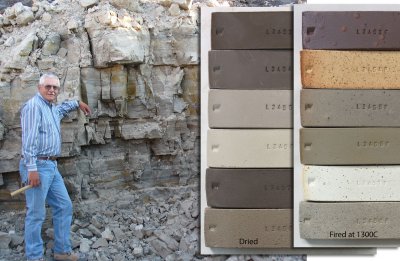
Six different sedimentary clays are extracted from this quarry. It was opened in the 1970s, the best location available at the time. These test bars were made by slaking select lumps from each layer (thus exhibiting their best performance). The left-most dried test bars show the layers (top to bottom). The A1 top layer is the most plastic and has the most iron contamination (it is used in our most speckled reduction firing bodies). A2, the second one down, is a ball clay (similar to commercial products, although darker burning), it is very refractory and the base for Plainsman Fireclay. A3, third from top, is a complete buff high-temperature stoneware (like H550), although sandy and over-mature at cone 10. 3B, third from bottom, is a smooth medium-temperature stoneware; it contains significant natural feldspar (although fired color and particulate contamination are the most variable). The second from the bottom, 3C. fires the whitest and is the most refractory (it is the base for H441G). The bottom one, 3D, the best product in the quarry. Although the least plastic and most silty, it is also very fine particled and the cleanest (consistently free of particulate impurities and sand), it pairs very well with a ball clay to make a cone 6 stoneware. Context: A1 Ball Clay, A2 Ball Clay, A3 Stoneware Clay, 3B Clay, 3C White Ball Clay.., 3D Clay, How to Find and.., Plainsman Ravenscrag Quarry in.., Plainsman Clays Website -.., About Plainsman Clays, Secondary Clay, Plainsman Clays, Clay, Mother Nature's Porcelain -.., Plainsman 3D Mother Nature's.. Wednesday 28th May 2025 An All-Canadian Fine Ball Clay is in Sight!
On the right is Plainsman A2 ball clay with 35% nepheline syenite added to vitrify it around cone 6 (these bars are fired at cone 2, 4, 5, 6 and 7 - top to bottom). Using our grinding equipment, we can process it to 42 mesh, as we have done since the 1970s. On the left is a Flintoft ball clay (cone 10R top and 10, 9, 8, etc - top to bottom). But this is the raw material, just slaked (not ground). It reaches zero porosity at cone 6 without a feldspar addition (because Mother Nature has added it for us). And the plasticity? This ball clay dry shrinks 9%, it is super plastic, much more than the A2/feldspar mix. While nearby deposits also contain refractory ball clays, this one is truly something special. It enables not just highly plastic vitreous stonewares but it fires white enough to be a potential ingredient in an All-Canadian plastic cone 6 porcelain. In an unexpected turn of events, we now have the opportunity to get this clay in a way that is much easier than expected. We have tested mixing this with PR3D, the best material in our Ravenscrag quarry - together the two can make killer clay bodies! Context: El Dorado of Pottery.., Another Saskatchewan Outrop We.., Here is why new.., An upgrade to benefit.. Friday 16th May 2025 Here is What Processing a Clay Can Do
The clay is Plainsman 3B. Context: Mother Nature's porcelain and.., I drink from these.., Make your own sieve.., 42 mesh Friday 16th May 2025 A Highly Plastic White Burning Kaolinized Sand:This proves we can have a Canadian kaolin
This is kaolinized sand from Flintoft, Saskatchewan. It is among clays we are currently rediscovering. This is far more plastic and fires much whiter than our Ravenscrag quarry equivalent. Consider highlights of physical tests to characterize it (data shown lower left): Context: Will soil testing help.., We Have Been Overlooking.., El Dorado of Pottery.., Claybank Brick Plant National.., Insight-Live com cloud-based ceramic.. Friday 16th May 2025 We Have Been Overlooking Better Clay Deposits
An update of the book "Clay Resources of Saskatchewan". The cover photo is titled "Kaolinized sand of the Whitemud Formation". The writers are lamenting the underutilization of this resource and almost pleading for industry to recognize its value! The cover shows the mining face at the historic Claybank brick plant. This clay is far whiter than what Painsman Clays mines at Ravenscrag, Sask (about 250km west of this). This site was mined from the 1800s to 1970s. Bricks were made in half a dozen large beehive kilns and, even though reduction-fired with gas, they burned far too white. The company increased reduction to the point that soot formed on the bricks to darken the color and turn them brown! Context: Landmark Book on the.., A Highly Plastic White.., Whiter Clays and Grinding.., Plainsman Ravenscrag Quarry in.., Claybank Brick Plant National.. Friday 16th May 2025 Another Saskatchewan Outrop:We need to pay more attention
This one is saying: "I am the whitest kaolin in Saskatchewan. And, I am so plastic that even though I am mixed with 50% sand, I can be modelled and formed with no problem. Just remove the sand and you will have a world-class kaolin that is Canadian". W. G. Worster, called these kaolinized sands, which can be found in south central part of the province, "splendid". This outcrop is in Halbrite, a small town southeast of Weyburn. There are lots of other deposits, especially in the Wood Mountain, Flintoft and Claybank area that are also much whiter than anything we currently can get in Ravenscrag. But this one is king so far. Should we keep importing from Georgia or develop our own Canadian kaolin? Context: Landmark Book on the.., An All-Canadian Fine Ball.. Friday 16th May 2025 Whiter Clays and Grinding Capacity:Two problems solved in one place!
This is at the Whitemud Resources metakaolin (MK) site midway between Scout Lake and Wood Mountain, Saskatchewan. They mine ore that is separated into kaolin (reject material is silica sand) then dehydroxylated into metakaolin; an SCM (Supplementary Cementing Material), MK itself is a natural aluminosilicate pozzolan. They have a giant plant (the dome is big enough to play soccer in) and are capable of processing an order of magnitude more than we can. The mining face in their quarry appears to have the same layers that we mine in Ravenscrag. But, there are very fortunate differences: Context: We Have Been Overlooking.., El Dorado of Pottery.. Friday 16th May 2025 El Dorado of Pottery Clay Finally Found!
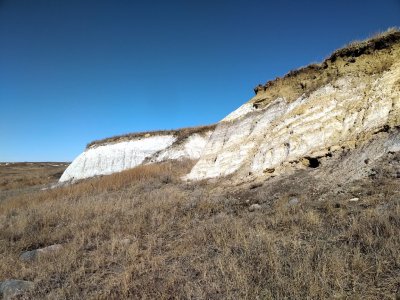
It has been five years since getting and testing samples of an amazing porcelain-like, clean-burning, highly plastic middle-temperature stoneware raw material from south central Saskatchewan. It is far superior to anything we have now. But, due to mix-ups, it appeared its location had been lost! But coming here to search again has turned up new information and I am quite certain this is the site (at Flintoft, Saskatchewan). Seeing and walking it has confirmed, contrary to the information we had, that the site is highly suitable for extraction (previous mine workings to the left are not shown). And, it is not the only site in the area. The Whitemud clays here are quite different from those in our Ravenscrag quarry, they are so good they obsolete almost everything we have (except perhaps PR3D). On seeing the range and quality, I am beyond excited! There are a lot of ducks that have to be lined up to be able to actually extract from a site like this, but the location has a lot of advantages. The current economic realities will be a powerful motivator to developing Canadian clay sources. Context: Whitemud clays in dinosaur.., A Highly Plastic White.., An All-Canadian Fine Ball.., Whiter Clays and Grinding.. Thursday 15th May 2025 Buffalo skull that inspired the Plainsman logo
This in on display at the visitor center of the Grasslands National Park in Val Marie, Saskatchewan. Perhaps ones like this formed part of the inspiration Luke Lindoe had when conceiving of the logo for the company he would form. To us, this area is "clay country", but to tourists it is a place to see the living prairie and also history like dinosaur fossils, the mass extinction boundary, hearth sites, tipi rings, bison drive lanes, and cellar depressions. Context: Luke Lindoe in 1971 Wednesday 14th May 2025 SignUp For Monthly Tech-Tip EmailPlease visit https://digitalfire.com and use the Register feature at the top of the page. No art or sales language, no tracking and no ads. To find past posts please use the search bar on this page. |
Plainsman Pottery Supply, 9517 - 41 Ave NW, EDMONTON, AB T6E 5X7
Phone: 780-440-4791, FAX: 780-490-7591, Email: larry@plainsmanclays.com